Make Your Own Graphic Assets
 Amiga Machine Code - Letter VI - Bonus Material
The Amiga Machine Code Course, contains many examples using graphics, but we have never created our own graphics. In this post we are going to make up for it, by showing how to create custom graphics and store them in a format that works with the program examples. Let’s get to it! 🎨
This post is a continuation of Amiga Machine Code Letter VI - Blitter 3.
The Toolchain
As always, I like to consider tools that were available back when the course was written. In this case, the year is 1989 and Deluxe Paint III was the undisputed drawing program of the time. Deluxe Paint was created by Dan Silva, initially as an in-house product at EA, called Prism. As more and more features were added, it’s marketabilty increased, and voila, Deluxe Paint was born.
There’s a nice tribute page to Deluxe Paint over at the Computer History Museum. The site also contains a manual and reference card, but especially cool is the video, Profesional Techniques for Deluxe Paint III, which made me realize that I was a n00b at using the program back then 😃. The video is also sprinkled with comments from Dan Silva.
Amazing video 👍.
Deluxe Paint III, was also the last in the series that Dan Silva worked on, before he left EA to work on 3D Studio - made by the Yost Group, which sold the rights to AutoDesk in 1997.
The second program in our toolchain, is Deluxe IFF Converter 1.0, written by Christian Haller. The program excels in converting IFF to raw, and raw to IFF, which is exactly what we need. The program is available on DISK1 in the c folder and is called IFFCon.
Christian Haller, made a bunch of tools and games, and many of them are listed on his homepage. You can see some of them on his youtube channel. He doesn’t list IFFCon as one of his tools though, but I think his list is incomplete, since he doesn’t mention his Insanity-Fight editor either. Btw. the assembly source for Insanity Fight can be download on his site! Well, that’s a story for another day.
So, our toolchain consists of Deluxe Paint III - aka. dpaint, and IFFCon. This toolchain allows us to convert from IFF to raw, which we need to get our artwork from dpaint converted into a format our program can read. However, we also need to convert from raw to IFF, because, as we shall see in a little moment, we need to get a palette of colors into dpaint.
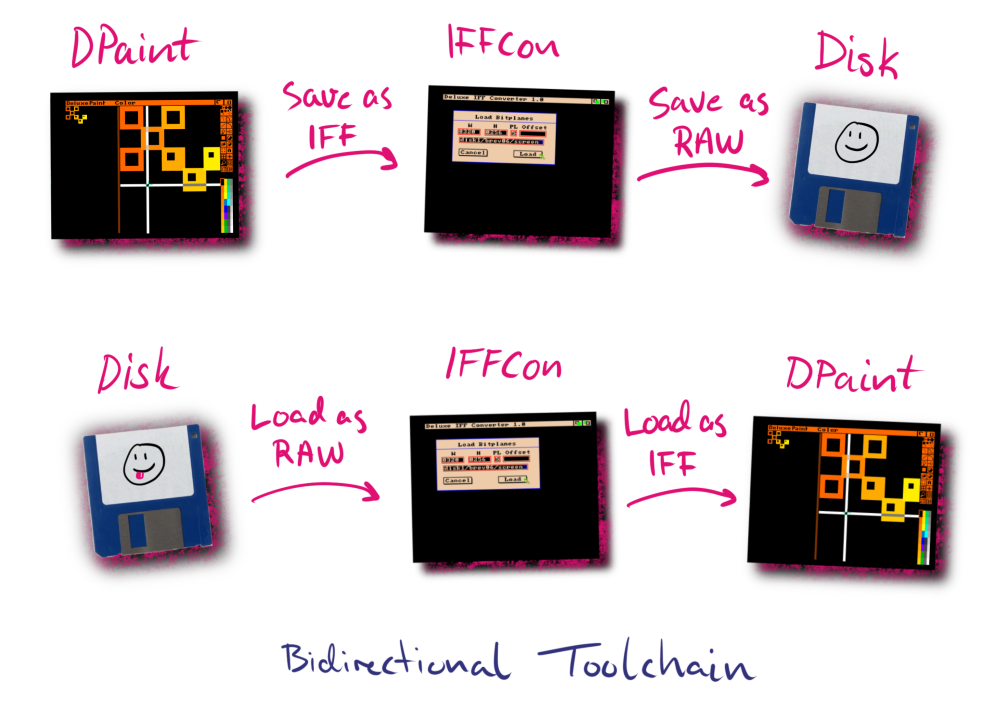
I omitted some of the disks in the above diagram. The gist being that files are used to transfer data between DPaint and IFFCon.
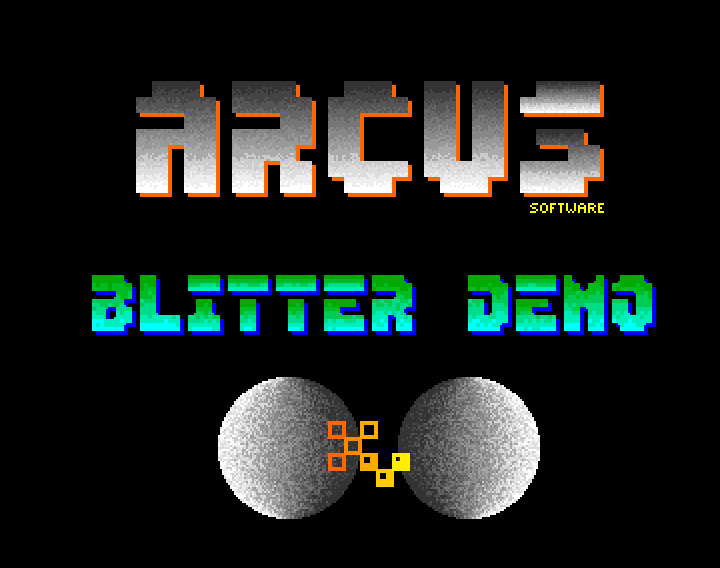
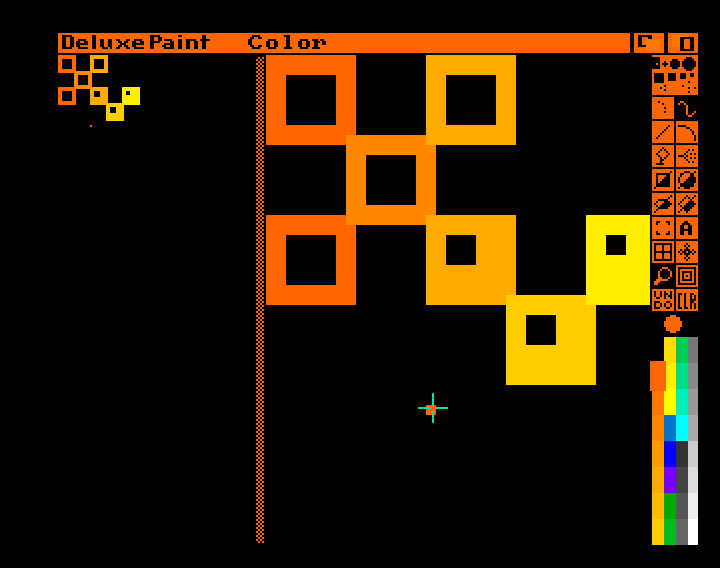
Before we move on - let’s look at the final result. The donut has been replaced with some squares 👍.
Now, let’s step through the dirty details.
Transfering the Palette to DPaint
Since our aim is to get mc0602 working with the new graphics, we need to consider that all colors come from the screen file. Somehow those colors have to be read into dpaint, so that we can create new graphics using the same palette.
The screen file cannot be read directly into dpaint, because it’s stored in raw format. We can fix this easily using IFFCon to convert the image from raw to IFF. Here it helps to list what we know about the screen file:
- It has a resultion of 320 x 256 pixels
- It has 5 bitplanes
- It has 32 colors stored at the start of the file
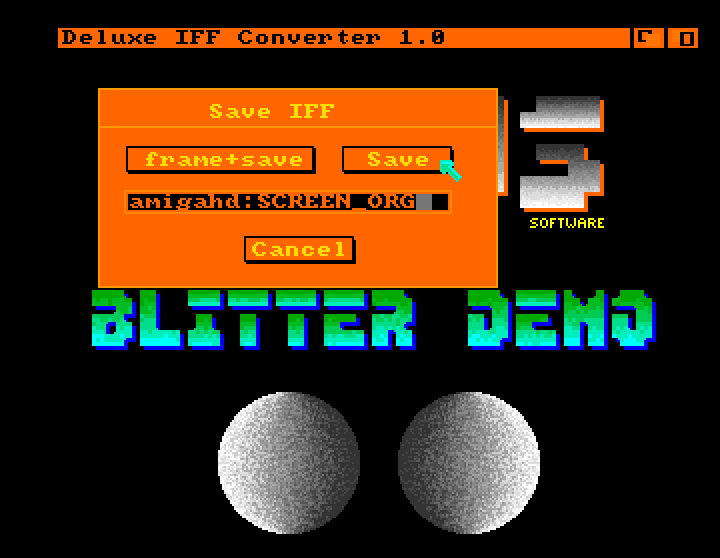
Now, use the CLI to start IFFCon, that can be found in the c folder of DISK1. Go into the menu Other / Colormap and choose Before Pic. This tells IFFCon where to look for the colormap. Next, go into the menu Project / Load and choose Bitmap, which will open a dialog.
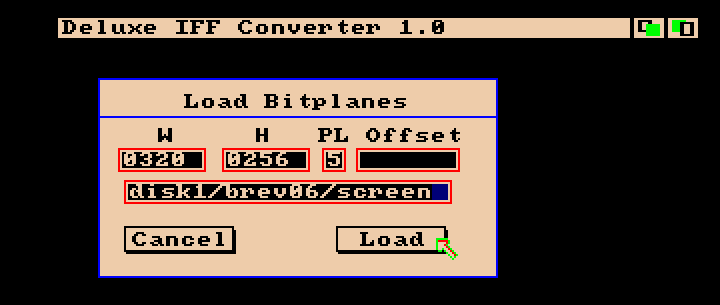
Fill in the details. Set the Width to 320, the Height to 256, and PL (bitPLanes) to 5. Last, but not least, tell it where the screen file is located. The file should now be displayed correctly in IFFCon.
Next, save the file as an IFF by using the menu Project / Save and choose Bitmap. A save dialog will appear. Give the file a name - I have called it SCREEN_ORG and press the Save button.
Now, we have an image file that dpaint can read 😃👍.
Open up dpaint and choose the default screen format (Lo-Res 320x200) and 32 colors. Don’t mind that the resolution is wrong. Via the menu Picture choose Load and load the SCREEN_ORG file. Answer yes, when dpaint asks if you want to change the format to that of the file.
We have now loaded the image, and by doing this, we have also modified the palette, so that it matches the one in the screen file. We can now start to do some artwork! 🎨.
Creating Graphics
In dpaint, with the right palette, the first thing to do is to clear the image, so that we can start from scratch. To make it easy, I will assume that the new artwork has the same dimensions as the old donut that we are replacing. Otherwise I would have to rewrite the mc0602 program. Here’s what we know about the donut BOB.
- It’s stored in two files; FIG and MASK
- FIG has 5 bitplanes
- MASK has 1 bitplane
- Both FIG and MASK have a resolution of 64 x 45 pixels
The graphics I created, are just a couple of squares alligned to an 8 by 8 grid that goes through 0,0. In this way it’s easy for me to make sure that the drawing is within the 64 x 45 pixel boundary.
Next, I save the image by using the menu Picture and choose save. I have given it the filename FIG2_ORG.
Before we quit dpaint, we shold also make a mask. This can be done by keeping the existing image, but only using 1 bitplane. In the menu Picture choose Screen Format… and set the number of colors to 2, then press Ok.
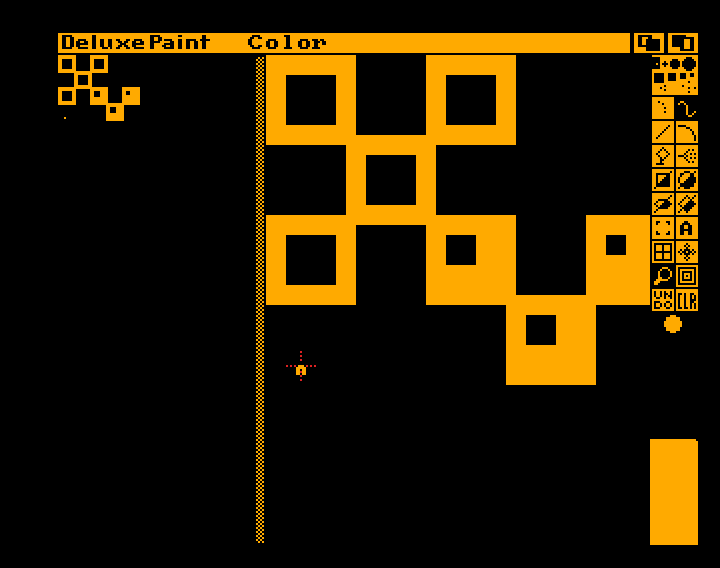
Voila, you have now made a mask. Save the image - I have given it the filename MASK2_ORG. The mask will tell the blitter which pixels are transparent, using the cookie-cut function.
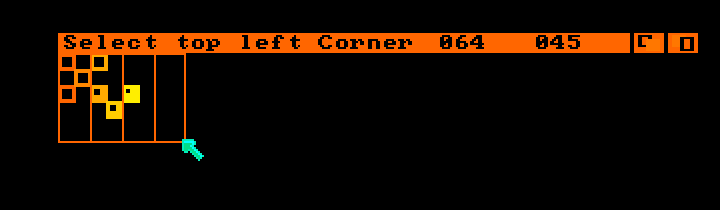
The final step is to convert FIG2_ORG and MASK2_ORG to raw by using IFFCon. Open up IFFCon and load FIG2_ORG as an IFF. Then use the menu Other / Colormap and choose “no cmap”. We have no need for a colormap, since that’s fetched from the screen file.
Use the menu Project / Save and choose Bitmap and name the file FIG2, then press the button “frame+save”.
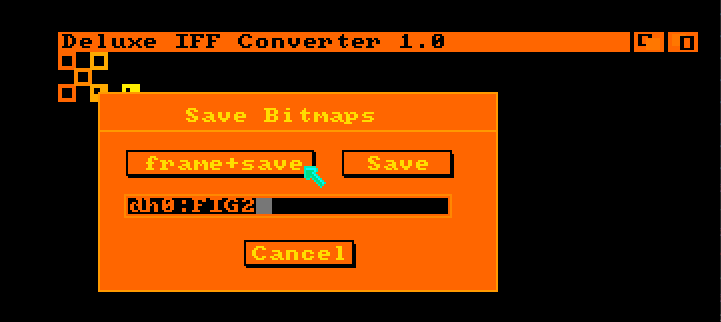
Draw a frame from (0,0) to (64,45). This will only save the part of the image that is within the frame.
To check if it went well, try to load it again as a bitmap with width 64, height 45 and 5 bitplanes. The colors will be off, since there is no colormap, but that is no problem.
Do the same conversion from IFF to raw for the MASK2_ORG file, and you’re ready to use the new artwork 👍.
You can compile the mc0602 progam by following the instructions in Amiga Machine Code Letter VI - Blitter 3 and replace the filenames fig and mask with fig2 and mask2 🚀.
The Legacy of Deluxe Paint
Deluxe Paint was THE painting program on the Amiga. It has a far and wide legacy and been an inspiration to many. The Bushy Tree Diagram, which I learned about recently, even lists Deluxe Paint as the predecessor to Photoshop. I could not find confirmation of this, from Thomas Knoll or John Knoll, the brothers that created Photoshop. But given how huge Deluxe Paint was, it must have been so.
One thing that really was magical to me, back in the 80s, was color cycling, where the palette could be animated over a fixed range. This effect, could make an otherwise still image appear animated.
One artist, that took color cycling to the next level, is Mark Ferrari, creator of the art behind some very big games on the Amiga, all created in Deluxe Paint. There’s a very nice HTML5 simulation of color cycling, using his artwork, that is well worth a visit. Mark Ferrari has, like Dan Silva, worked at Lucasfilm.
When I watched the above Deluxe Paint instruction video, I noticed that Dan Silva perhaps was moving away from Deluxe Paint. Around 17:34 he says:
What got me back into being interested in working on Deluxe Paint was, just the idea what would it be like having a paint program where you could paint on seperate frames of an animation.
It took Dan Silva one and a half year of work, programming the animation capabilities, into what became Deluxe Paint III. His last work on Deluxe Paint, before he left EA.
It’s fun how some addition to a tool, like animation to a paint program, can have far reaching consequences. Over in the UK, a group of guys could not agree on what was the right height for little men in a game. Mike Dailly, said that 8 by 8 pixels was enough, and they proved it by animating it in Deluxe Paint. It was great fun and they also animated small traps - and that was how the hugely popular game, Lemmings was born. Read more about that, in Jimmy Maher’s blog, The Digital Antiquarian.
To this day, Deluxe Paint is still used by enthusiast around the world. Here’s an example from the art collective Shynola - a music video animated in Deluxe Paint! Junior Senior - Move Your Feet 😃 🎶.
Previous post: Amiga Machine Code Letter VI - Blitter 3
Next post: Amiga Machine Code Letter VII - Blitting and Scrolling.