Line drawing 3 - Code Example
 Line Drawing Code - Amiga Machine Code - Letter XII
Using the Amiga blitter to do line drawing is not so easy. There are a lot of moving parts to take care of before that first line hits the screen.
Part 1 of this post discussed the history of the Bresenham algorithm, and retraced the steps to make the algorithm efficient. In Part 2, we continued by taking a look at how the Amiga blitter uses Bresenham’s algorithm. In Part 3, it’s finaly time to look at some code. 🚀
We have reached letter XII of the Amiga Machine Code Course, which is the last letter in the series. At this stage of the course, the code only comes with a brief explaination. Naturally you can read along here, for more commentary on how the code works. 😉
We are going to look at the Linetest program from Disk 2, but be warned, the program contains some bugs 🐜 🐜. I don’t think I can submit a bug report anywhere, so I will just write my findings in the end of the post, and provide a link to the fixed program.
Alrighty then, let’s get started 😃.
The Linetest program
The Linetest program lets the user draw lines by moving the mouse. The first point of the line is fixed, while the other point follows the mouse cursor. The program is exited by clicking the left mouse button.
The program follows the familiar pattern for programs in this course. First we take over the Amiga system, by disabling all interrupts, and then enters a main loop, that is exited by clicking the mouse. The program then goes on to reestablish the system and returns.
Durring the execution, two subroutines are called. The first subroutine is Initlinedraw, that setup the input parameters to the Linedraw subroutine, which takes care of the actual line drawing.
The Linedraw subroutine is a bit complex, so we will look at it later in this post. For now let’s take a look at the Linetest program with it’s Initlinedraw subroutine.
linetest:
    move.w	#$4000,$dff09a     ; INTENA  - disable all interrupts
    move.w	#$01a0,$dff096     ; DMACON - disable bitplane, copper, sprite

    lea.l	screen(pc),a1      ; move address of screen into a1
    lea.l	bplcop+2(pc),a2    ; move address of plcop+2 into a2

                                   ; set BPL1PTH / BPL1PTL in bplcop to screen
    move.l	a1,d1              ; move screen pointer into d1
    move.w	d1,4(a2)           ; move a word to set BPL1PTL in bplcop
    swap	d1                 ; swap words in the 32 bit register d1
    move.w	d1,(a2)            ; move a word to set BPL1PTH in bplcop

    lea.l	copper(pc),a1      ; move address of copper into a1
    move.l	a1,$dff080         ; move long copper address into COP1LCH / COP1LCL

    move.w	#$8180,$dff096     ; DMACON - enable bitplane, copper

    bsr	initlinedraw               ; branch to subroutine initlinedraw

main:
    moveq	#100,d0            ; line pos x1 in d0
    moveq	#100,d1            ; line pos y1 in d1

    move.w	$dff00a,d2         ; move value in JOY0DAT into d2
    move.w	d2,d3              ; move value in d2 into d3
    andi.w	#$ff,d2            ; line pos x2 is mouse x values in d2
    lsr.w	#8,d3              ; line pos y2 is mouse y values in d3

    bsr.s	linedraw           ; branch to subroutine linedraw

    btst	#6,$bfe001         ; test left mouse button
    bne.s	main               ; if not pressed goto main

    move.l	4.w,a6             ; make a6 point to ExecBase of exec.library
    move.l	156(a6),a6         ; IVBLIT points to GfxBase
    move.l	38(a6),$dff080     ; copinit ptr to copper start up list restore workbench copperlist

    move.w	#$8020,$dff096     ; DMACON enable sprite
    rts                            ; return from subroutine

; ----------------------------------------------
; Linedraw subroutine is omitted, but goes here.
; The subroutine has it's own code listing.
; swid = 40 ; screen width in bytes (part of the Linedraw listing)
; ----------------------------------------------

initlinedraw:
    lea.l	screen(pc),a0      ; move address of screen into a0
    lea.l	octant(pc),a1      ; move screen of octant into a1
    move.l	#$dff000,a2        ; move value into a2

waitinit:                          ; wait for blitter
    btst	#6,$2(a2)          ; DMACONR test Blitter DMA enable
    bne.s	waitinit           ; if not Blitter DMA enable goto waitinit
    move.l	#-1,$44(a2)        ; BLTAFWM / BLTALWM
    move.l	#$ffff8000,$72(a2) ; BLTBDAT / BLTADAT
    move.w	#swid,$60(a2)      ; BLTCMOD
    move.w	#swid,$66(a2)      ; BLTDMOD
    rts                            ; return from subroutine

octant:
    dc.w	$0051,$0055,$0059,$005d
    dc.w	$0041,$0049,$0045,$004d
    dc.w	$0011,$0015,$0019,$001d
    dc.w	$0001,$0009,$0005,$000d

copper:
    dc.w	$2001,$fffe     ; wait for vpos >= $20 and hpos >= $0
    dc.w	$0102,$0000     ; set BPLCON1 (scroll)
    dc.w	$0104,$0000     ; set BPLCON2 (video)
    dc.w	$0108,$0000     ; BPL1MOD (odd bitplanes)
    dc.w	$010a,$0000     ; BPL2MOD (even bitplanes)
    dc.w	$008e,$2c81     ; DIWSTRT upper left corner at y/vpos = $2c, x = $81
    dc.w	$0090,$f4c1     ; DIWSTOP enable PAL trick
    dc.w	$0090,$38c1     ; DIWSTOP lower right corner at y/vpos = $12c,
    dc.w	$0092,$0038     ; DDFSTRT data fetch start at vpos = DIWSTRT, hpos = $38
    dc.w	$0094,$00d0     ; DDFSTOP data fetch stop at vpos = DIWSTOP, hpos = $d0
    dc.w	$0180,$0000     ; COLOR00 set to black - background color
    dc.w	$0182,$0ff0     ; COLOR01 set to yellow - foreground color
    dc.w	$2c01,$fffe     ; wait for vpos >= $2c and hpos >= $0
bplcop:
    dc.w	$00e0,$0000     ; BPL1PTH (high bit 16-31)
    dc.w	$00e2,$0000     ; BPL1PTL (low bit 0-15)
    dc.w	$0100,$1200     ; BPLCON0 enable 1 bitplane, enable color burst
    dc.w	$ffdf,$fffe     ; wait for vpos >= $ff and hpos >= $de
    dc.w	$2c01,$fffe     ; wait for vpos >= $12c and hpos >= $0 (counter roll over)
    dc.w	$0100,$0200     ; BPLCON0 disable bitplane - older PAL chips
    dc.w	$ffff,$fffe     ; wait for vpos >= $ff and hpos >= $fe
                                ; wait indefinitely - until next vertical blanking

screen:
    blk.w	5120,0          ; Allocate mem for a 320x256 screen
Before the main loop is entered, the code transfers the memory position of the screen to the copper list, and sets the first copper list address to point to the copper label. The copperlist takes care of setting up the blitter, the DMA data fetch, and the color table. The program then calls Initlinedraw, which performs the initial setup for the Linedraw subroutine.
The Initlinedraw subroutine takes care of preloading the three address registers, a0-a2, with the address of the screen bitplane, the octant table, which we will return to later, and the base address of the custom chip register. The address registers are later used as input to the Linedraw subroutine.
Initlinedraw also waits for the blitter DMA enable bit to be set, so that it can write to the blitter registers. For channel $A$ it sets all the blitter mask bits for the first and last word in BLTAFWM and BLTALWM i.e. no masking. Then it sets BLTBDAT to a solid line texture, and sets BLTADAT to a line brush of one pixel. Finally the width of the screen is set in BLTCMOD and BLTDMOD.
In the main loop, the first point of the line $p_1(x_1, y_1)$ is set to a fixed coordinate, and the second point $p_2(x_2, y_2)$ is set to the current mouse curser position. The point data is stored in four data registers, d0-d3, so that the Linedraw subroutine can fetch them. At every interation of the main loop, the Linedraw routine is called, and a check is performed, so that the main loop is exited if the left mouse button is pressed.
The Linedraw Subroutine
The Linedraw subroutine takes care of setting up the blitter to perform line drawing. It setups a bunch of blitter registers that have not already been setup by the Initlinedraw subroutine, among those, the two blitter control registers BLTCON0 and BLTCON1. Before it returns to the caller, it sets BLTSIZE to initialize the blit.
The Linedraw subroutine is not a general purpose routine for line drawing. Some choices have been made, like not making it possible to enable drawing single pixels pr. raster line, or setting the function generator.
The Linedraw subroutine performs all the setup with regards to setting the octant and accumulator, which involve some fair amount of logic.
If you havent' already, I’ll recommend that you go and read about how the Amiga does line drawing. Much of the code will seem murky wihout that introduction.
In high-level languages like C and Java, functions can have parameters. It’s not quite the case for the low-level assembly language. At this level, functions does not exist, but have been lowered to subroutines, which doesn’t have input parameters. Input to subroutines are made possible by e.g. preloading the input, into data and address registers. This is also the case for the Linedraw subroutine.
The Linedraw subroutine is shown in the code listing below. In the comments you can see which data and address registers are expected to be preloaded with input.
; Subroutine linedraw
; If both points are equal, then no line is drawn.
; Input:
;   d0: x1 x-coordinate of first point
;   d1: y1 y-coordinate of first point
;   d2: x2 x-coordinate of second point
;   d3: y2 y-coordinate of second point
;   a0: pointer to the bitplane
;   a1: pointer to the octant table
;   a2: base address of the custom chip register $dff000

    swid=40                        ; screen width in bytes

linedraw:
    cmp.w	d0,d2              ; compare x1 and x2
    bne.s	ld_not1pix         ; if x1 != x2 goto ld_not1pix
    cmp.w	d1,d3              ; compare y1 and y2
    bne.s	ld_not1pix         ; if y1 != y2 goto ld_not1pix
    rts                            ; return from subroutine

ld_not1pix:                        ; Points are not the same pixel
    movem.l	d4/d7/a3-a4,-(a7)  ; push registers on the stack
    moveq	#0,d7              ; clear octant index d7
    sub.w	d0,d2              ; store dx=x2-x1 in d2
    bge.s	ld_xok             ; if dx>=0 goto ld_xok
    neg.w	d2                 ; store -dx in d2
    addq.w	#2,d7              ; add 2 to octant index d7 (dx < 0)

ld_xok:                            ; dx is OK
    sub.w	d1,d3              ; store dy=y2-y1 in d3
    bge.s	ld_yok             ; if dy>=0 goto ld_yok
    neg.w	d3                 ; store -dy in d3
    addq.w	#4,d7              ; add 4 to octant index d7 (dy < 0)

ld_yok:                            ; dy is OK
    cmp.w	d3,d2              ; compare dy and dx
    bgt.s	ld_xyok            ; if dx > dy goto ld_xyok
    bne.s	ld_not45           ; if dx != dy goto ld_not45
    add.w	#16,d7             ; add 16 to octant index d7 (dx == dy)

ld_not45:                          ; line is not 45 degrees
    exg	d2,d3                      ; exchange dx and dy so that dx is largest
    addq.w	#8,d7              ; add 8 to octant index d7 (dy > dx)

ld_xyok:                           ; dx and dy is OK
    add.w	d3,d3              ; 2dy to d3
    move.w	d3,d4              ; 2dy to d4
    sub.w	d2,d4              ; 2dy-dx to d4
    add.w	d3,d3              ; 4dy to d3
    move.w	d3,a3              ; 4dy to a3
    add.w	d2,d2              ; 2dx in d2
    add.w	d2,d2              ; 4dx in d2
    sub.w	d2,d3              ; 4dy - 4dx in d3
    mulu	#swid,d1           ; convert y1 coordinate to byte offset
    move.l	a0,a4              ; Screen pointer to a4
    add.w	d1,a4              ; Screen + y1 to a4
    move.w	d0,d1              ; x1 to d1
    lsr.w	#3,d1              ; convert x1 coordinate to byte offset (x1/8)
    add.w	d1,a4              ; Screen + y1 + x1 to a4.
    andi.w	#$f,d0             ; d0 sets BLTCON0 / BLTCON1 Keep the first four bits of x1
    ror.w	#4,d0              ; Within a word rotate right 4 bits.
    add.w	#$bc8,d0           ; Add values to three lowest nibbles
    swap	d0                 ; Swap the words in d0
    move.w	(a1,d7.w),d0       ; move octant value at d7 into d0
    lsl.w	#4,d2              ; d2 sets BLTSIZE bit 15-6 holds dx
    addq.w	#2,d2              ; bit 5-0 holds 2

ld_wldraw:
    btst	#6,$2(a2)          ; DMACONR test Blitter DMA enable
    bne.s	ld_wldraw          ; if not set then goto ld_wldraw
    move.l	d0,$40(a2)         ; BLTCON0 / BLTCON1
    move.w	d3,$64(a2)         ; BLTAMOD
    move.w	a3,$62(a2)         ; BLTBMOD
    move.w	d4,$52(a2)         ; BLTAPTL
    move.l	a4,$48(a2)         ; BLTCPTH / BLTCPTL
    move.l	a4,$54(a2)         ; BLTDPTH / BLTDPTL
    move.w	d2,$58(a2)         ; BLTSIZE
    movem.l	(a7)+,d4/d7/a3-a4  ; pop the stack into registers
    rts
The Linedraw subroutine draws a line, that is defined by two points, on a bitplane, by using an octant table, and the base address of the custom chip register. All these input parameters are supplied through the data and address registers.
The first part of the Linedraw subroutine takes care of calculating $\Delta x$ and $\Delta y$. At the very start, there is an early out if the two points are equal to each other. During the calculation, an index is updated, that is later used to make a lookup into the octant table.
At the very end of the Linedraw subroutine performs a busy wait for the blitter DMA enable bit to be set. It then proceeds to write to the blitter registers, setting BLTSIZE last, which will start the blit.
The two most complex registers to setup is BLTCON0 and BLTCON1. Setting this stuff up can be quite a lengthy exercise. 😑
A trick back in the day, was not to bother with the elaborate logic. Instead, the problem was reduced to finding an index into a lookup table, and that’s exactly the purpose of the octant table.
octant:
    dc.w	$0051,$0055,$0059,$005d
    dc.w	$0041,$0049,$0045,$004d
    dc.w	$0011,$0015,$0019,$001d
    dc.w	$0001,$0009,$0005,$000d
Each word in the octant table corresponds to a setting of BLTCON1. It’s easier to understand if we look at the bit values.
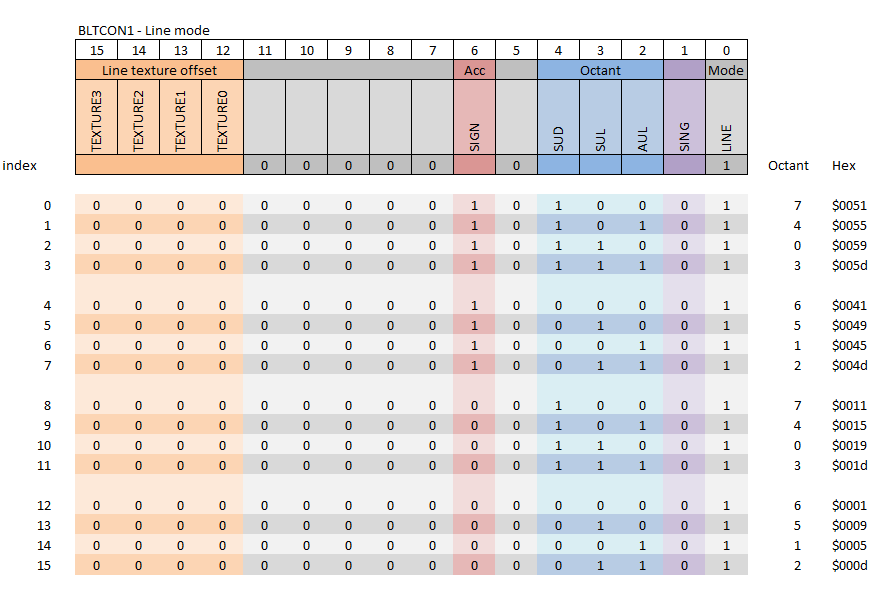
Since the octant table decides the values, we can’t provide our own start bit for the line texture, or choose to set the SING bit.
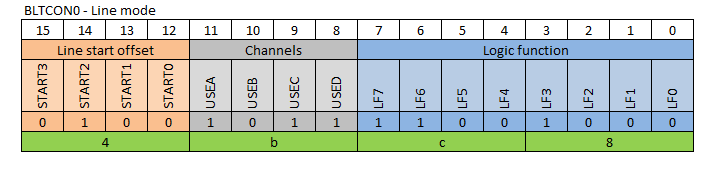
Let’s look at a brief example of how the code sets up the BLTCON0 and BLTCON1 registers.
Example: We have a line where $x_1 = 20$, and lies in octant 7. The initial accumulator value is positive, so the SIGN bit should not be set.
...                        ; d0 = $ 0000 0014 = x1
andi.w	#$f,d0             ; d0 = $ 0000 0004
ror.w	#4,d0              ; d0 = $ 0000 4000
add.w	#$bc8,d0           ; d0 = $ 0000 4bc8
swap	d0                 ; d0 = $ 4bc8 0000
move.w	(a1,d7.w),d0       ; d0 = $ 4bc8 0011
...
move.l	d0,$40(a2)         ; BLTCON0 / BLTCON1
...
In this case BLTCON0 is set to $\$4bc8$ and BLTCON1 is set to $\$0011$.
The example shows that setting the registers can become almost unreadable in assembly code. The octant table is a way to simplyfy a lot of the logic needed for setup of BLTCON1.
During my work with this code, I noticed something was a bit off. I wonder what that could be…
The Bugs
I felt like an archaeologist, as I started poking around in this ancient code from 1989. And lo and behold, it seemed like there were some bugs. But where should I file the bug report?
It’s amazing what can be found on the internet. In the EXEC magazine, issue 01+02 from 1990, I found an advert for the Amiga Machine Code course, complete with addresses of the distrubutors.
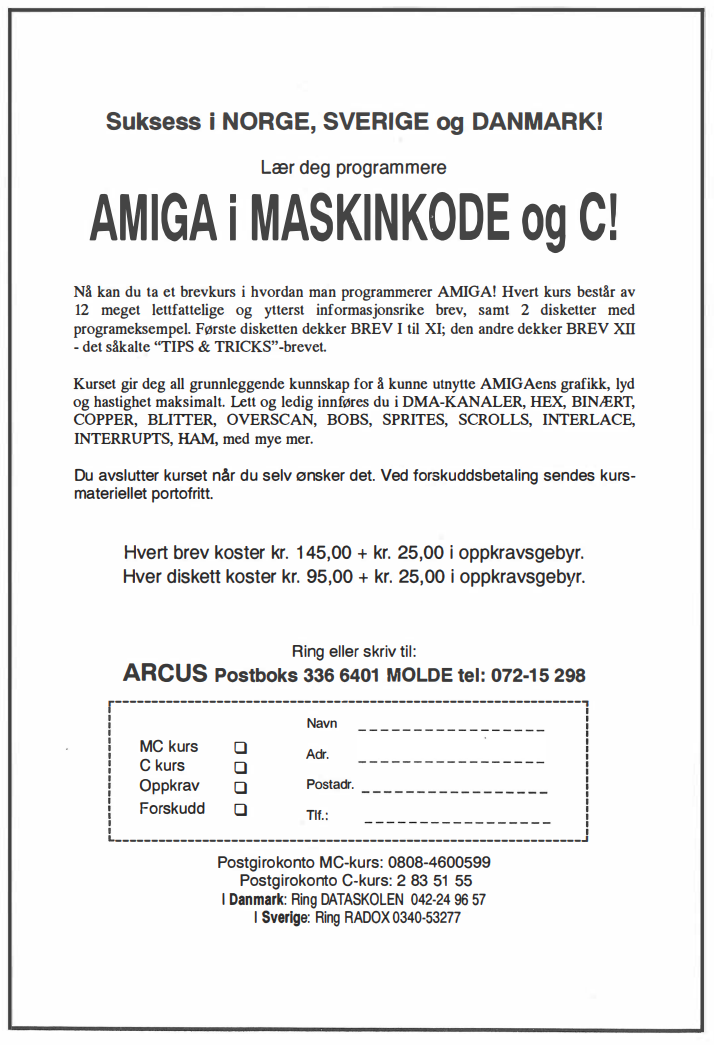
If I was really hellbent about submitting a bug report for this ancient code, then writing to any of the three distributors would seem like a way to go. But have any of them survived to this day? Let’s find out.
The Danish distributor was DATASKOLEN. A quick lookup in the Danish company register, reveals that it closed in 1997. So let’s move on to the Swedish distributor RADOX. According to the Swedish company register, it closed in 1996. Then there is ARCUS from Molde in Norway. I couldn’t find anything on them, so I guess they are closed too…
Well, I just might as well report the bugs here, and suggest some fixes along the way.
The Minterm bug
I found this bug in the Linedraw subroutine, while messing around with the line texture. It has something to do with the minterm given to the function generator.
add.w #$bc8,d0 ; Add values to three lowest nibbles
The offending line always set BLTCON0 bits 7-0 to the minterm $\$c8$, which corresponds to the following expression. $$AB + BC = D$$
This expression has the effect that the line texture in channel $B$ is visible, not just where the line is, but in the background as well.
The fix is simple, we just need to use the minterm $\$ca$, which is the normal configuration for line mode.
$$AB + \overline AC = D$$
add.w #$bca,d0 ; FIX: Add values to three lowest nibbles
The Sign Bit Bug
Going through the code revealed an issue with the sign bit. Let’s look at the original code snippet.
ld_yok:                        ; label, dy is OK
    cmp.w	d3,d2          ; compare dy and dx
    bgt.s	ld_xyok        ; if dx > dy goto ld_xyok
    bne.s	ld_not45       ; if dx != dy goto ld_not45
    add.w	#16,d7         ; add 16 to octant index d7 (dx == dy)
The index into the octant table is stored in d7, and only if $\Delta x = \Delta y$ is 16 added to it. The 16th byte, or the 8th word, into the octant table corresponds to where the SIGN bit is set to 0.
The effect is that we only clear the SIGN bit in BLTCON1 if $\Delta x = \Delta y$, which must be a bug.
According to the Amiga Hardware Reference Manual:
We initialize the A pointer register to 4 * dy - 2 * dx. If this value is negative, we set the sign bit (SIGNFLAG in BLTCON1 ), otherwise we clear it.
The SIGN bit should be set only if $4\Delta y - 2\Delta x$ is negative. The proposed fix is first to strip out the offending code.
ld_yok:                        ; label, dy is OK
    cmp.w	d3,d2          ; compare dy and dx
    bgt.s	ld_xyok        ; if dx > dy goto ld_xyok
    ; bne.s	ld_not45       ; FIX: remove code
    ; add.w	#16,d7         ; FIX: remove code
And then increment the octant index later.
ld_xyok:                       ; label, dx and dy is OK
    add.w	d3,d3          ; 2*dy to d3
    move.w	d3,d4          ; 2*dy to d4
    cmp.w	d3,d2          ; FIX: compare d3=2dy with d2=dx
    bgt.s	ld_sign_ok     ; FIX: if dx > 2dy goto ld_sign_ok
    add.w	#16,d7         ; FIX: no sign is needed 2dy - dx >= 0
ld_sign_ok:
    sub.w	d2,d4          ; 2*dy-dx to d4
This should fix the sign bug, but I also noticed that something was a is a bit strange with the way the initial accumulator value is calculated down at the last line.
The Initial Accumulator Bug
I initially found his bug, when reseaching the Bresenham algorithm. I couldn’t get my reference implementation to give the same output as the Linedraw program. The error is very subtle, and it only affects the second pixel of the line.
A good place to start the investigation, would be the initial accumulator value. If that value is incorrect, it will effect where the second pixel of the line is drawn. The following code from the Linedraw subrotine sets up the three accumulator values.
ld_xyok:                       ; label, dx and dy is OK
    add.w	d3,d3          ; 2dy to d3
    move.w	d3,d4          ; 2dy to d4
    sub.w	d2,d4          ; 2dy-dx to d4
    add.w	d3,d3          ; 4dy to d3
    move.w	d3,a3          ; 4dy to a3
    add.w	d2,d2          ; 2dx in d2
    add.w	d2,d2          ; 4dx in d2
    sub.w	d2,d3          ; 4dy - 4dx in d3
The gist of the code can be expreseed in this table:
| Description | Register | Address | Expression |
|---|---|---|---|
| initial accumulator value | BLTAPTL | $\$DFF052$ | $d4 = 2\Delta y - \Delta x$ |
| accumulator increment wihtout minor step | BTLBMOD | $\$DFF062$ | $a3 = 4\Delta y$ |
| accumulator decrement with minor step | BLTAMOD | $\$DFF064$ | $d3 = 4(\Delta y - \Delta x)$ |
The error is in the calculation of the initial acumulator value. It’s not the same order of magnitude as the other accumulator values. It’s half the size of what it should be. But even worse, it can become uneven, which is a problem since address registers, such as BLTAPTL, can only hold even values. If an uneven value is stored in BLTAPTL it will be truncated to a lower even value. So this has to be fixed.
The fix is just to double the value and the code looks like this, when combined with the fix for the SIGN bit.
ld_xyok:                       ; label, dx and dy is OK
    add.w	d3,d3          ; 2dy to d3
    move.w	d3,d4          ; 2dy to d4
    cmp.w	d3,d2          ; FIX: compare d3=2dy with d2=dx
    bgt.s	ld_sign_ok     ; FIX: if dx > 2dy goto ld_sign_ok
    add.w	#16,d7         ; FIX: no sign is needed 2dy - dx >= 0
ld_sign_ok:
    sub.w	d2,d4          ; 2dy-dx to d4
    add.w	d4,d4          ; FIX: 4dy-2dx to d4
    add.w	d3,d3          ; 4dy to d3
    move.w	d3,a3          ; 4dy to a3
    add.w	d2,d2          ; 2dx in d2
    add.w	d2,d2          ; 4dx in d2
    sub.w	d2,d3          ; 4dy - 4dx in d3
The BLTSIZE Bug
According to the documentation the BLTSIZE should be set like this:
- Bits 15-6 = dx + 1,
- Bits 5-0 = 2
But the code is different. It only sets bits 15-6 to dx, which means the last line pixel won’t get drawn. Here’s what a fix would look like:
lsl.w	#4,d2              ; d2 sets BLTSIZE bit 15-6 holds dx
add.w   #$40,d2            ; FIX: bit 15-6 now holds dx + 1
addq.w	#2,d2              ; bit 5-0 holds 2
There might be reasons for not drawing the last pixel, but it seems hackish and is not documented in any way.
Lines Are Everywhere!
Line drawing is a natural stepping stone into some more advanced topics in computer graphics. We’ve seen how the Amiga uses Bresenham’s algorithm to do blitter line drawing, but this is only the beginning.
The lines produced by Bresenham’s algorithm are not the final evolution of lines. E.g. they have no anti-aliasing and have a jagged appearance. If performance considerations allows it, then an obvious next step would be to implement Xiaolin Wu’s paper An Efficient Antialiasing Technique (PDF).
But there’s more; line drawing is also the basic building block of wireframes and polygons, both in two and three dimensions. If time permits, I will write more about that in future posts.
I have applied all the fixes to the Linetest program, which you can download by clicking this link. To run it, type the following into the Seka assembler:
SEKA>r
FILENAME>linedraw_fixed
SEKA>a
OPTIONS>
No errors
SEKA>j
And that’s all for now. Cheers 😃 🍺
Previous post: Amiga Machine Code Letter XII - Line Drawing 2