Amiga Machine Code Detour - Reverse Engineering
 ImHex in the background
History has shown time and again, a demand for reverse engineering of programs. The reasons are many, some innocent and some not. Either way, it’s an interesting skill to have, that will make you a better programmer. The tools might be simple, but the knowledge needed are somewhat more demanding.
By now, we know enough machine code, to take a detour into the land of reverse engineering. This trip will reveal how shockingly easy it is to alter a programs behavior, with relatively simple tools. I call this post a detour, since the Amiga Machine Code Course does not cover this topic.
Let me just put this straight: Reverse enginering is mostly a long and teadious challange, and it’s hard to go from a binary to a 100% finished result.
Since all software eventually becomes machine-readable code, we can get an idea of what a program does, by looking at the binary hex values and finding the equivalent opcodes. We could do that manually, but this quickly becomes super boring. Much better for our sanity, is to use a disassembler, which is a tool that transforms the binary opcodes to assembly code.
It’s no surprice that disassemblers knows the target hardware architecture really well, and the better ones even know the custom chip flags and library offsets.
The Tools
In this post we are going to use the Capstone disassembler, which is relatively new. It’s interesting because it supports many platforms, but also because it piggybacks on the huge momentum of the LLVM Compiler Infrastructure. It uses TableGen from that project, to get the definitions of a huge range of platforms architectures. This is really it’s secret souce, since the constant updates of hardware architectures is a maintenance nightmare.
Another tool is just a simple hex editor. One that is capable of inserting and deleting values in the binary executable. This is also a process known as patching.
The Mission
We are going to reverse engineer the mc0201 program, that uses the copper to draw the Norwegian colors on the screen. The program is very simple and short, so it’s ideal for this post.
First download the binary executable to your Amiga harddrive and run it, or compile the program from source and then run it. You should see the colors of the Norwegian flag:

Our mission is to change this progam, so that it displays the Russian flag, by patching the executable.
Let’s take a look at the executable using either xxd or a hex editor.
> xxd -g 1 mc0201
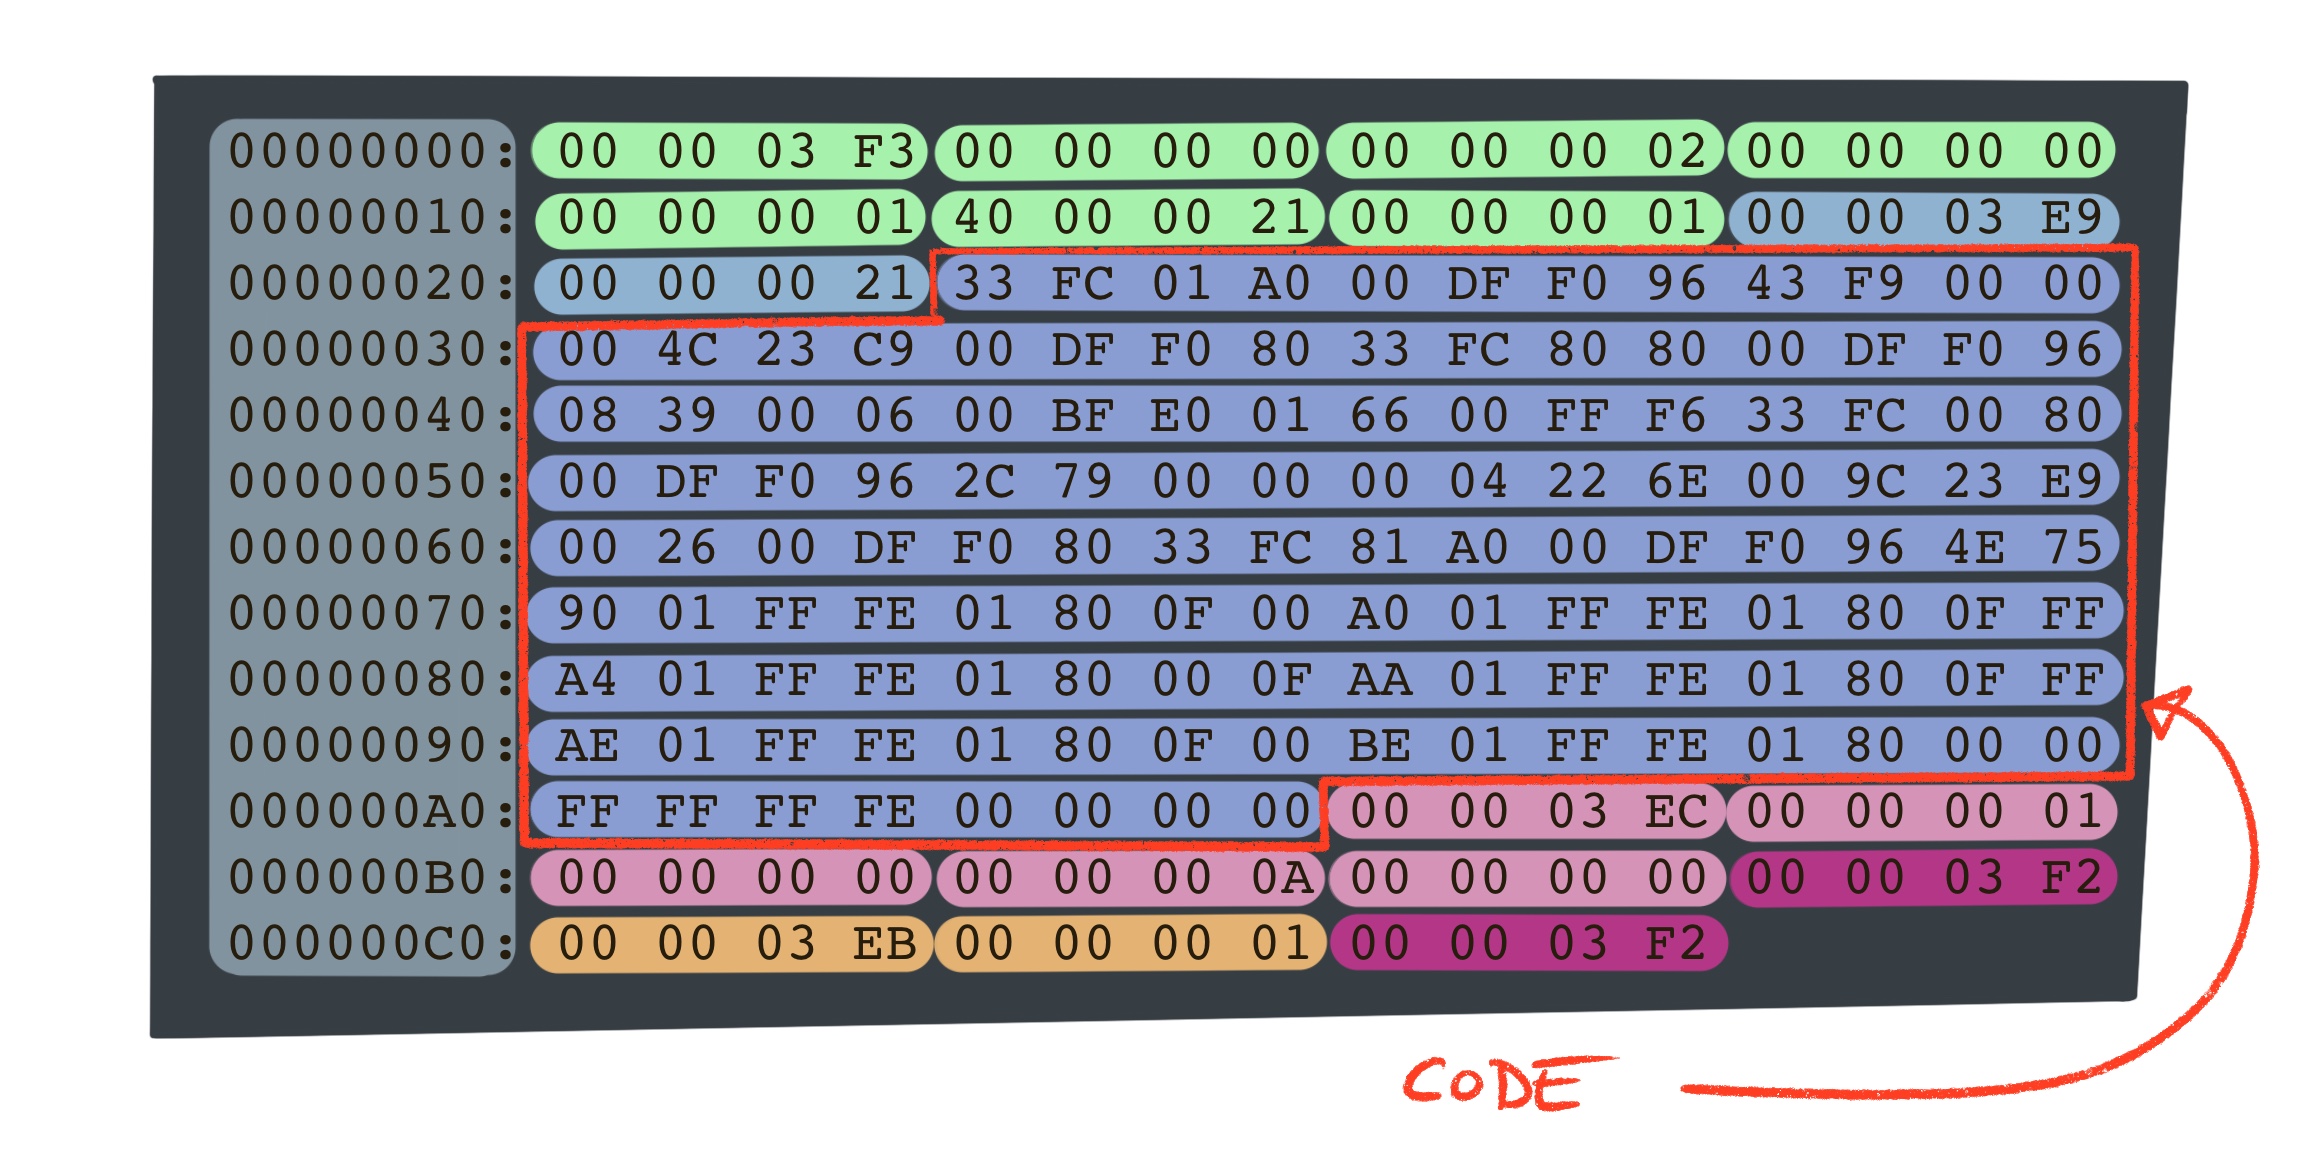
00000000: 00 00 03 f3 00 00 00 00 00 00 00 02 00 00 00 00 ................
00000010: 00 00 00 01 40 00 00 21 00 00 00 01 00 00 03 e9 ....@..!........
00000020: 00 00 00 21 33 fc 01 a0 00 df f0 96 43 f9 00 00 ...!3.......C...
00000030: 00 4c 23 c9 00 df f0 80 33 fc 80 80 00 df f0 96 .L#.....3.......
00000040: 08 39 00 06 00 bf e0 01 66 00 ff f6 33 fc 00 80 .9......f...3...
00000050: 00 df f0 96 2c 79 00 00 00 04 22 6e 00 9c 23 e9 ....,y...."n..#.
00000060: 00 26 00 df f0 80 33 fc 81 a0 00 df f0 96 4e 75 .&....3.......Nu
00000070: 90 01 ff fe 01 80 0f 00 a0 01 ff fe 01 80 0f ff ................
00000080: a4 01 ff fe 01 80 00 0f aa 01 ff fe 01 80 0f ff ................
00000090: ae 01 ff fe 01 80 0f 00 be 01 ff fe 01 80 00 00 ................
000000a0: ff ff ff fe 00 00 00 00 00 00 03 ec 00 00 00 01 ................
000000b0: 00 00 00 00 00 00 00 0a 00 00 00 00 00 00 03 f2 ................
000000c0: 00 00 03 eb 00 00 00 01 00 00 03 f2 ............
We could start patching the executable right away, but where to make the changes? This is where the disassembler will come in handy.
A naive approach, is to let the Capstone disassembler chew through the hex values, but that will not work, because an exacutable is more than just program code.
The Amiga Binary File Structure
Our exectuable is stored in a binary format, that makes it consumable by an executable loader. The job of the loader is to put the program into memory, so that it can be run directly by the CPU.
There exists a bunch of executable file formats, for a wide range of operating systems. Windows has PE and Unix has ELF, just to mention a few, and the Amiga has the Hunk format 💪😃.
To understand what goes on in the program, we need to look at the file, not as single blob of data, but as a file composed of fragments. And to do that, we need to know a bit about the Hunk format. An early version of it, is documented in the AmigaDOS Technical Reference Manual.
The Hunk Header Block
The mc0201 starts with a hunk header block. It contains informations about which libraries to load, and how many hunks are present and their sizes. This makes it possible for the loader to preallocate the memory needed for the program.

The hunk header always starts with the longword $\$3F3$, and it’s kind of a magic cookie that tells the AmigaOS that this file is an executable.
The file continues with a longword of zero, telling the loader that the program does not rely on external libraries.
The loader is then told to allocate a table with room for two hunks, followed by the first hunk, hunk 0, and the last hunk, hunk 1.
The file continues with the sizes of all hunks. Hunk 0 requires $\$21$ longwords, and since bit 30 is set, the loader must allocate chip mem or fail. This tells the reverse engineer, that the program probably relies on DMA operations by the custom chips.
The Hunk Code Block
This block contains the program code. It also states how much code there is, and the code itself, which must be padded with zeros to the nearest longword boundary.
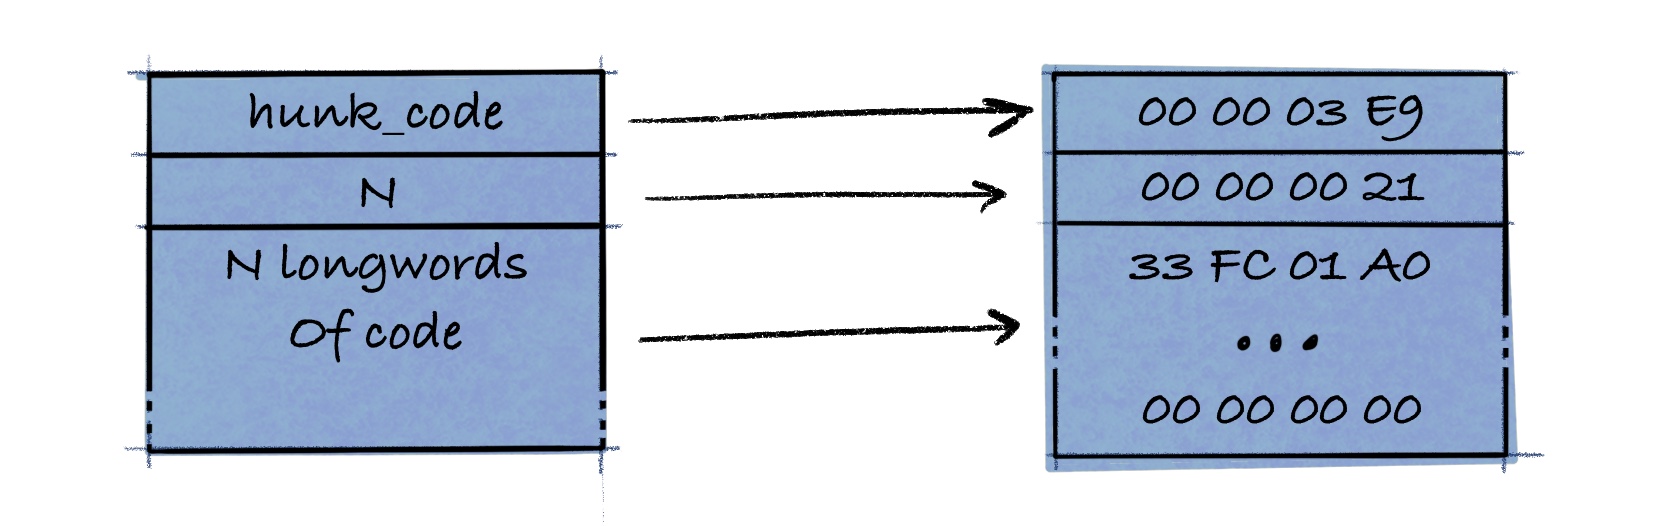
Our file tells the loader that the size of the code is $\$21$ longwords, followed by the code itself. This code will eventually be run by the CPU and custom chips.
The Hunk Relocation Block
This block specify which parts of the code that needs to be relocated. The loader will decide where to load the program. Since the code can be stored arbitrary in memory, any references inside the code must be relocated, so that they point to the correct memory locations. The loader uses the relocation block to determine which bytes to relocate.
The block contains a list of offsets for each hunk which is terminated by a 0 longword.
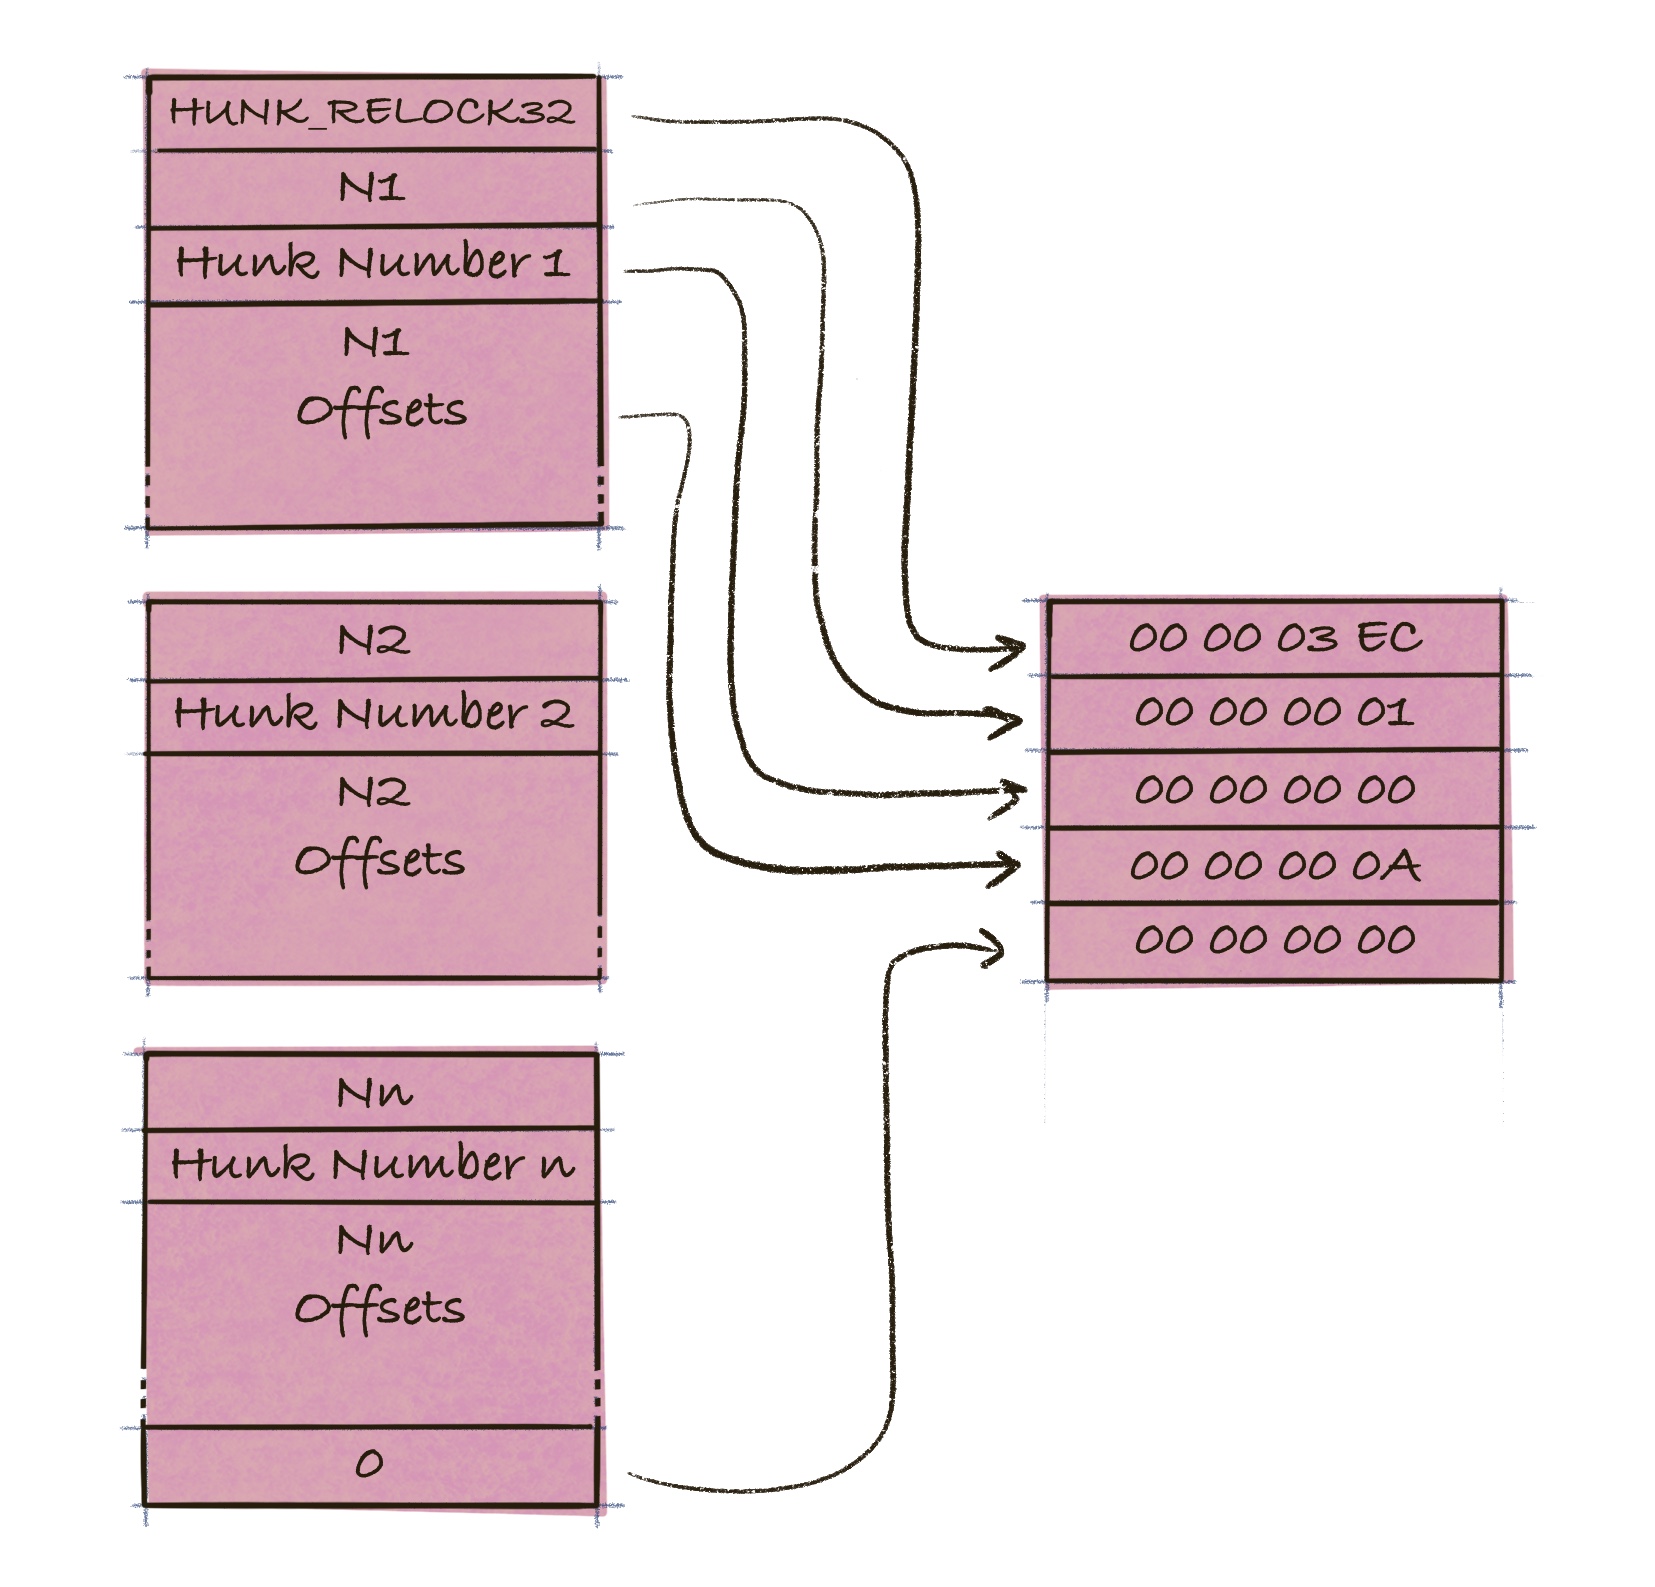
Our binary contains one offset for hunk 0, that is located at offset $\$A$ bytes in the code.
The Hunk BSS block
This block specifies an amount of memory, which should be allocated by the loader at runtime, instead of bloating the executable.

The binary specifies that the loader should allocate 1 longword of memory.
The Hunk End block
This blok marks the end of the block.

The binary contains two hunks, so there are two of these in the file.
Now we know the different fragments in the binary and we have located the code. Let’s move on to do some disassembling! 🚀
Disassembling the code
First we need to copy the code part of mc0201 into it’s own file.
> dd bs=4 skip=9 count=33 if=mc0201 of=mc0201_code
Then verify that all the code is there
> xxd -p mc0201_code
33fc01a000dff09643f90000004c23c900dff08033fc808000dff0960839
000600bfe0016600fff633fc008000dff0962c7900000004226e009c23e9
002600dff08033fc81a000dff0964e759001fffe01800f00a001fffe0180
0fffa401fffe0180000faa01fffe01800fffae01fffe01800f00be01fffe
01800000fffffffe00000000
The code looks fine 😃 let’s feed it to Capstone. But we have to remove the new line characters, since Capstone’s cstool will choke on them.
> xxd -p mc0201_code | tr -d '\n' | xargs -I{} cstool m68k {}
 0  33 fc 01 a0 00 df f0 96  move.w	#$1a0, $dff096.l
 8  43 f9 00 00 00 4c        lea.l	$4c.l, a1
 e  23 c9 00 df f0 80        move.l	a1, $dff080.l
14  33 fc 80 80 00 df f0 96  move.w	#$8080, $dff096.l
1c  08 39 00 06 00 bf e0 01  btst.b	#$6, $bfe001.l
24  66 00 ff f6              bne.w	$1c
28  33 fc 00 80 00 df f0 96  move.w	#$80, $dff096.l
30  2c 79 00 00 00 04        movea.l	$4.l, a6
36  22 6e 00 9c              movea.l	$9c(a6), a1
3a  23 e9 00 26 00 df f0 80  move.l	$26(a1), $dff080.l
42  33 fc 81 a0 00 df f0 96  move.w	#$81a0, $dff096.l
4a  4e 75                    rts
4c  90 01                    sub.b	d1, d0
4e  ff fe                    dc.w	$fffe
50  01 80                    bclr.b	d0, d0
52  0f 00                    btst.l	d7, d0
54  a0 01                    dc.w	$a001
56  ff fe                    dc.w	$fffe
58  01 80                    bclr.b	d0, d0
Ok, this is not completely flawless, but it’s pretty close 😃. If you want to check the opcodes, then use the 68K opcode sheet.
At offset $\$8$ there is a lea to $\$4c$ that is put into a1. At the next line, the value is moved to $\$dff080$ which is the custom chip register COP1LCH/COP1LCL holding a pointer to the copper list. This means we have a copper list starting at offset $\$4c$.
Btw. from the hunk relocation block, we saw that offset $a needs to be relocated, which is the effective address lea should put into a1. Since the loader can place the program anywhere in chip mem, this effective address needs to be relocated.
Capstone is a bit clueless when it comes to the copperlist, so it has matched a wide range of opcodes, that are all wrong. It also fails silently, so a bit of input is missing.
Let’s correct the copper list by hand and add some comments. ✏️
copperlist:
4c  90 01 ff fe    ; wait for vpos >= $90 and hpos >= $0
50  01 80 0f 00    ; COLOR00 = red
54  a0 01 ff fe    ; wait for vpos >= $a0 and hpos >= $0
58  01 80 0f ff    ; COLOR00 = white
5c  a4 01 ff fe    ; wait for vpos >= $a4 and hpos >= $0
60  01 80 00 0f    ; COLOR00 = blue
64  aa 01 ff fe    ; wait for vpos >= $aa and hpos >= $0
68  01 80 0f ff    ; COLOR00 = white
6c  ae 01 ff fe    ; wait for vpos >= $ae and hpos >= $0
70  01 80 0f 00    ; COLOR00 = red
74  be 01 ff fe    ; wait for vpos >= $be and hpos >= $0
78  01 80 00 00    ; COLOR00 = black
7c  ff ff ff fe    ; wait for vpos >= $ff and hpos >= $fe (end of copper)
80  00 00 00 00    ; zero padding - not part of copper
Now, we know that the program paints the flag using a copper list, and we even know at what offsets it does it. We can now move on to patch the executable, so that it will produce the Russian flag!
Patching the Executable
Make a copy of the mc0201 program and edit it using a hex editor. I’ve only made three changes to the executable.
- At offset $\$76$ changed $\$0f00$ (red) to $\$0fff$ (white)
- At offset $\$7e$ changed $\$0fff$ (white) to $\$000f$ (blue)
- At offset $\$8e$ changed $\$0fff$ (white) to $\$000f$ (blue)
Notice that the offsets given here are from the begining of the file, while the offsets given in the disassembled code, was from the begining of the code fragment.
Here’s a diff of the differences between the original and patched version of the executable.
diff <(xxd mc0201) <(xxd mc0201_patched)
8,9c8,9
< 00000070: 9001 fffe 0180 0f00 a001 fffe 0180 0fff  ................
< 00000080: a401 fffe 0180 000f aa01 fffe 0180 0fff  ................
---
> 00000070: 9001 fffe 0180 0fff a001 fffe 0180 000f  ................
> 00000080: a401 fffe 0180 000f aa01 fffe 0180 000f  ................
Now run the patched program. Mission accmplished, if it displays the Russian flag. Here’s a screenshot 😃

Well, that was shockingly easy - it only required three simple changes to the binary, which can be done with any hex editor! 😜
Final Thoughts
There is a good point in studying retro-tech, because many concepts, first implemented on older platforms, stands the test of time, and can be found in a refined form in present day systems.
Popular operating systems are also challanged by the security implications of binary patching. E.g. the Windows Portable Executable (PE) format has regions for Authenticode, that is used by the loader, to check the code, not the exectuable file, against modification. But it too can be gamed, according to a blog post, that describe an impractical attack.
It’s easy to do binary patching. It requires nothing more than a hex editor. The hard part is to reason about the system and finding the right tools to do the binary analysis. Actually, the copper list in our binary has a recognizable bit-pattern, so it’s possible to skip the disassembling altogether.
It would be even harder to reverse engineer binaries, if the code had been written in a high-level language. In that case, the assembler code would be the output from a compiler, which also could have optimized the code along the way. So just as we have disassemblers, there also exists decompilers for exactly that job.
We can now call it a win 🍰. We reached our goal of patching the program to display the Russian flag. For those really interested, it’s actually possible to shave off a few bytes from the executable, which is something you can try yourself.
The executable contains a hunk_bss block, that instructs the loader to allocate 1 longword of memory. This memory is not referenced by our code, since it’s not present in the hunk rellocation block.
Remove the hunk_bss block by following these steps:
- Edit the hunk_header block so that we only keep the first hunk.
- Remove the hunk_bss block.
Run the executable, to make sure it’s working. The file should shrink from 204 bytes to 188 bytes.
Happy patching 😃
Previous post: Amiga Machine Code Letter II - Part 2
Next post: Amiga Machine Code Letter III - Copper Revisited.